First, check whether the eye detail is still visible
Zoom in on each lens before you edit. Can you follow the eyelid and see the iris through the bright area? That is a useful candidate for a local adjustment. An opaque patch needs a different approach. Treat the two lenses separately; the same light can affect them very differently.
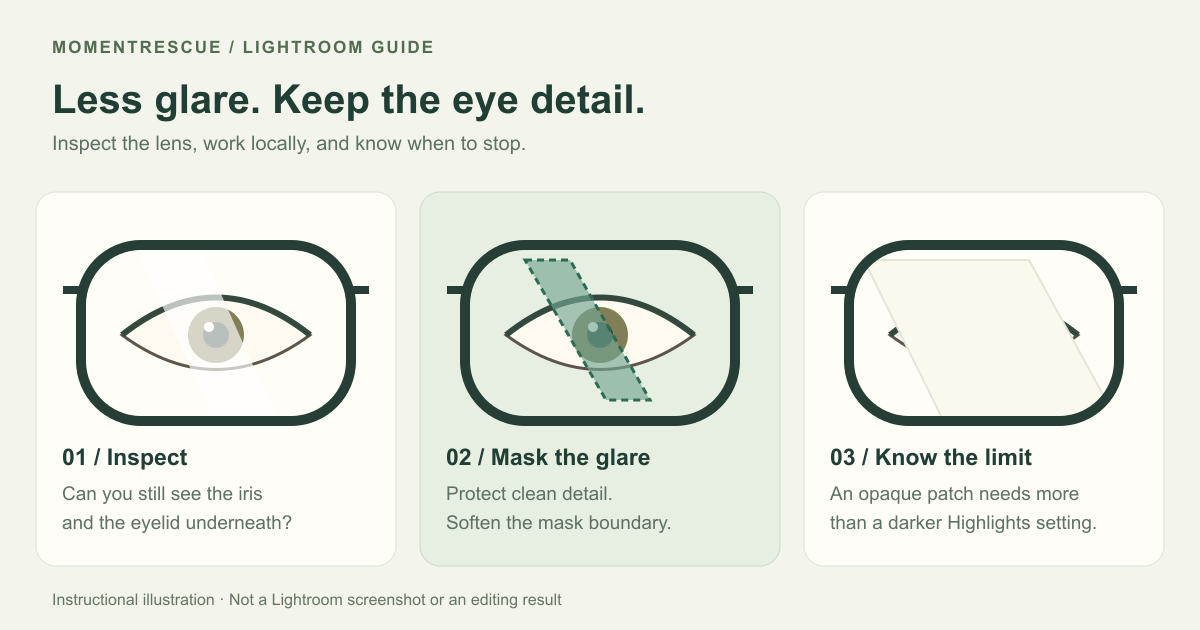
| What you see | Start with | Stop when |
|---|---|---|
| Bright haze; eye still visible | Brush mask, then Highlights and Whites | The lens becomes gray while detail stays unclear |
| Green or purple reflection | Local tone correction, then a small color adjustment | The iris or surrounding skin changes color |
| Tiny, isolated bright spot | Heal or Clone with nearby matching detail | The source repeats an eyelash, edge, or skin pattern |
| Opaque reflection over the eye | A clear reference photo and a different editing method | Tonal adjustments only darken the patch |
How to remove glasses glare in Lightroom and Lightroom Classic
Use the original file if you have it. A RAW file can offer more adjustment latitude than a heavily compressed copy, but it does not guarantee that hidden eye detail exists. Keep an unedited version for comparison. The controls below are local adjustments inside a mask.
Lightroom desktop
Open the photo in Detail view. Select Masking → Brush.
Lightroom Classic
Open Develop → Masking → Brush. Create a new mask if one already exists.
Lightroom mobile
Open the photo, then Masking → Create new Mask → Brush. See mobile steps below.
Adobe illustrates these controls in its Lightroom masking guide and Lightroom Classic masking guide. Panel names and grouping can vary with the app version.
Paint over the reflection, not the whole lens
Zoom to a comfortable close view. Choose a brush smaller than the affected area, soften its edge with Feather, and build the mask with controlled strokes. Show the mask overlay to find spill onto the rim, eyelashes, or cheek. Subtract or erase that spill before adjusting brightness.
Keep the mask tight enough to protect clean detail, with a soft transition at the reflection’s edge. A hard outline can leave a visible retouching ring.
Lower Highlights gradually
Hide the colored overlay so you can judge the actual photo. Move Highlights left in small increments and watch the eyelid and iris. The aim is to reduce the bright veil while retaining the eye’s shape. Leave the overall portrait exposure alone if the rest of the face already looks right.
There is no reliable one-size-fits-all slider value. If the reflection gets darker but no useful detail appears, pause instead of pushing the slider further.
Refine Whites, then Exposure if needed
If small bright patches still dominate, reduce Whites gently within the same mask. Use Exposure only for a remaining overall brightness mismatch in the selected patch. Compare the edited lens with the other lens and the surrounding skin after each change.
Dial the adjustment back if the glasses start to resemble tinted lenses. A little natural reflection is often more convincing than a flat, dark patch.
Reduce a green or purple color cast locally
For colored glare with visible detail underneath, try lowering Saturation slightly inside the affected mask. A small Temp or Tint adjustment can help balance a remaining cast. Watch the iris and skin rather than trying to make the lens completely neutral.
Use a separate mask if the colored patch needs a different boundary. Avoid desaturating the whole face or using color correction to disguise missing detail.
Retouch only small leftover spots
For a tiny highlight on an otherwise usable lens, try Heal or Clone in the Remove / Healing controls available in your version. Heal blends source texture with the destination; Clone copies source detail more directly. Choose a source with similar texture and lighting, and inspect its edges.
Do not stretch a skin sample over an iris or copy a large patch across the frame. If the source leaves a repeated pattern or a distorted eyelid, undo that correction. Adobe documents Classic’s retouching tools and source selection.
Compare both eyes and export a separate copy
Toggle the mask off and on, inspect at 100%, then return to the full portrait. Check the pupils, eyelids, frame shape, lens tint, and any brush-edge halo. Correct the other lens with its own mask if needed.
In Lightroom desktop, use the export options in Share. In Classic, choose File → Export. For a web or social copy, JPEG with sRGB is a practical choice; choose dimensions appropriate to the destination. Keep the original, and inspect the exported file before sharing it. See Adobe’s desktop export options or Classic export settings.
Remove glasses glare in Lightroom on iPhone or Android
The local-mask approach also works on a phone, although precision is harder on a small screen. Adobe lists Masking and Healing among its mobile subscription features.
- Open the photo and pinch to zoom into one lens.
- Tap Masking → Create new Mask → Brush. Set the brush Size, Feather, and Flow, then paint over the reflection. Use the erase control to clean up the boundary.
- Inside that mask, use Light to reduce Highlights and, if necessary, Whites. Use Color sparingly for a remaining cast.
- Hide the overlay, check the result at normal viewing size, and confirm the mask with Done. Repeat for the second lens only if necessary.
- To save a separate file, open Share → Export as. Choose JPG and the required dimensions and quality, then confirm with Done and choose the device’s save destination.
If your version shows a lock on Masking, global Highlights will affect the entire photo. Check feature access before following the local workflow. Adobe’s mobile masking instructions, local adjustment controls, and export guide show the interface and file options.
What about Lightroom’s Reflection Removal feature?
Reflection Removal and local masking solve different editing problems. Adobe’s Reflection Removal workflow describes removing reflections from photos taken through windows or glass. Its September 2026 Lightroom release notes report broader handling of windows, glass, and water.
Those documents do not establish reliable restoration of eyes obscured by eyeglass reflections. If your version offers the feature, you can compare its result, but examine eye shape, pupil placement, and frame edges rather than assuming a cleaner lens means a faithful eye.
Common problems and what to change
- The lens looks dark or gray.
- Reduce the mask’s tonal changes and inspect the boundary. If detail never emerges, treat the area as obscured rather than continuing to darken it.
- The glasses frame has a halo.
- Show the mask overlay. Erase spill from the frame and adjust the brush feather so the transition follows the reflection instead of crossing a sharp rim.
- The eye color looks wrong.
- Undo or weaken the local color adjustment. Compare with the original; do not neutralize the entire iris to remove a small colored reflection.
- Heal creates a strange repeated texture.
- Move the source to a better match or make the repaired area smaller. If there is no suitable source, undo the patch and switch methods.
When Lightroom is not enough
If a solid reflection covers the eye, consider a layer-based edit in Photoshop using another clear photo of the same person. The reference needs a compatible angle, expression, and lighting. Our guide to removing glasses glare from photos compares the broader editing options.
For a browser workflow, MomentRescue’s glasses glare tool lets you select one person, reduce lens reflections, and compare the result before downloading. A reference is optional; one included correction can use a clearer reference when the first result needs improvement. Generated detail can differ from the person’s real eyes, so check both eyes and the frames.
See how to choose a reference photo and current credit pricing. If you can retake the photo, changing the light or head angle and checking both lenses before the next shot is often the more faithful solution.
Frequently asked questions
Can Lightroom remove glare from glasses completely?
Sometimes a small reflection can be reduced or retouched until it is barely noticeable. Local tonal adjustments work best when eye detail is still recorded beneath the glare. They cannot recover an eye that is absent from the captured image. Severe glare may need a reference-based edit or AI reconstruction, which requires careful review.
Which Lightroom sliders reduce glasses glare?
Start with Highlights inside a Brush mask over the reflection. Lower Whites if bright patches remain, and use Exposure sparingly. For a colored reflection, try a small local Saturation, Temp, or Tint adjustment. There is no universal preset: stop if the lens looks gray or the iris loses its natural color.
Does Lightroom Reflection Removal work on eyeglasses?
Adobe describes Reflection Removal primarily for images taken through reflective surfaces, and newer releases expand its capabilities. The documentation reviewed for this guide does not promise reliable eyeglass or hidden-eye restoration. You can compare its result if it is available in your version, but inspect both eyes and the frames before keeping the edit.
Can I remove glasses glare in Lightroom on iPhone or Android?
Yes, for mild glare: open the photo, choose Masking, create a Brush mask, and adjust the affected area using Light and Color controls. Adobe lists mobile Masking and Healing as subscription features. If those tools are locked, the free global adjustments will also affect the rest of the photo.
Why does lowering Highlights make my glasses look gray?
The reflection may be too opaque, or the mask and adjustment may be too broad. Reduce the adjustment strength and check that the mask covers the glare rather than the entire lens. If the patch darkens but no iris or eyelid detail appears, stronger tonal changes are unlikely to produce a natural repair.
Sources and editorial notes
This guide combines Adobe’s documented controls with practical editing guidance from MomentRescue. It is not an Adobe product or an endorsement. The illustration explains the method; no Lightroom before-and-after test is claimed.